A. The Problem
Let’s consider the scenario that we just finalized our programme in Primavera and that the whole programme uses calendars with 8 working hours per day.
Consider it as a real world programme, big, 2-3 different calendars used (5day, 6day, 7day) and with all kind of relationships [FS, SS, FF (and SF if you like)], with lags.
For example we can see below on Figure 1 a small programme which contains FS, SS & FF relationships with lags:
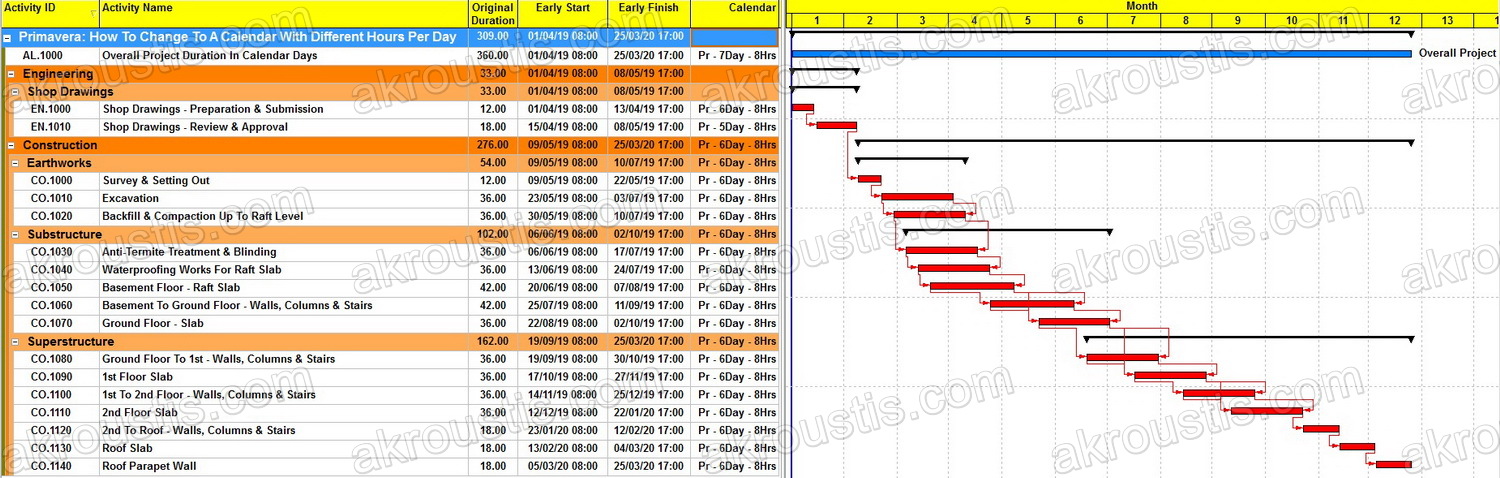
Figure 1
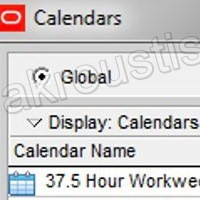
We have used 3 calendars: one with 5, one with 6 & one with 7 working days per week, all with 8 working hours per day, 08:00-12:00 & 13:00-17:00.
We receive a clarification from the client/supervisor that the working hours per day for this project are 10 per day, 07:00-17:00.
Before we make any changes to our programme, let’s make a copy of it as a baseline. Then it will be easy to identify any changes made.
From the menu: Project → Maintain Baselines
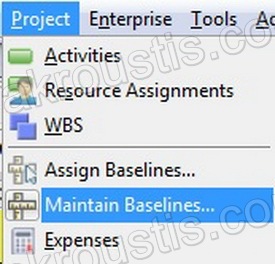
Figure 2
We click on “Add…” button & we select “Save a copy of the current project as a new baseline”
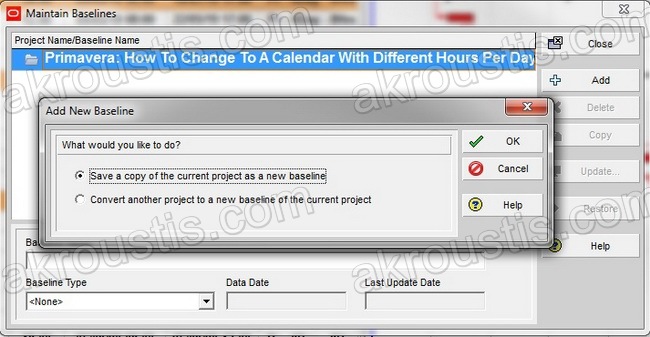
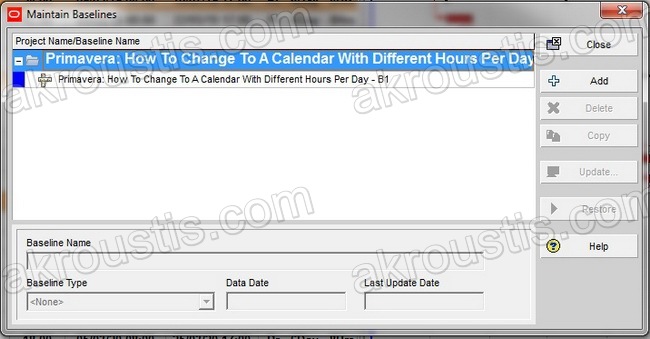
Figure 3
and from the menu: Project → Assign Baselines we select the baseline we just created as Project & Primary Baseline.
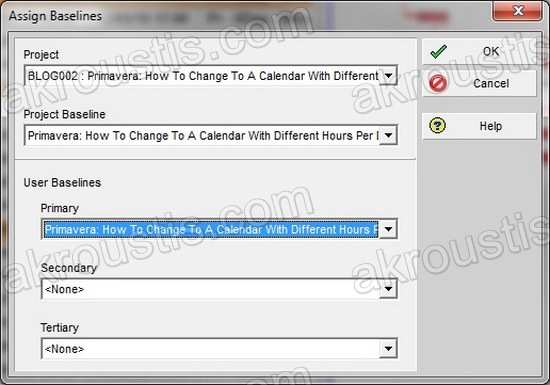
Figure 4
Finally, we adjust our Gantt chart to show the primary baseline bars with yellow color:

Figure 5
If we try to change the calendar of our activities with another one with different working hours per day, or if we try to modify the assigned calendar with different working hours per day, Primavera will change the total duration in days on these activities.
In our example I have created 3 additional calendars, with 5, 6 & 7 working days per week & 10 working hours per day, 07:00-17:00 as requested.
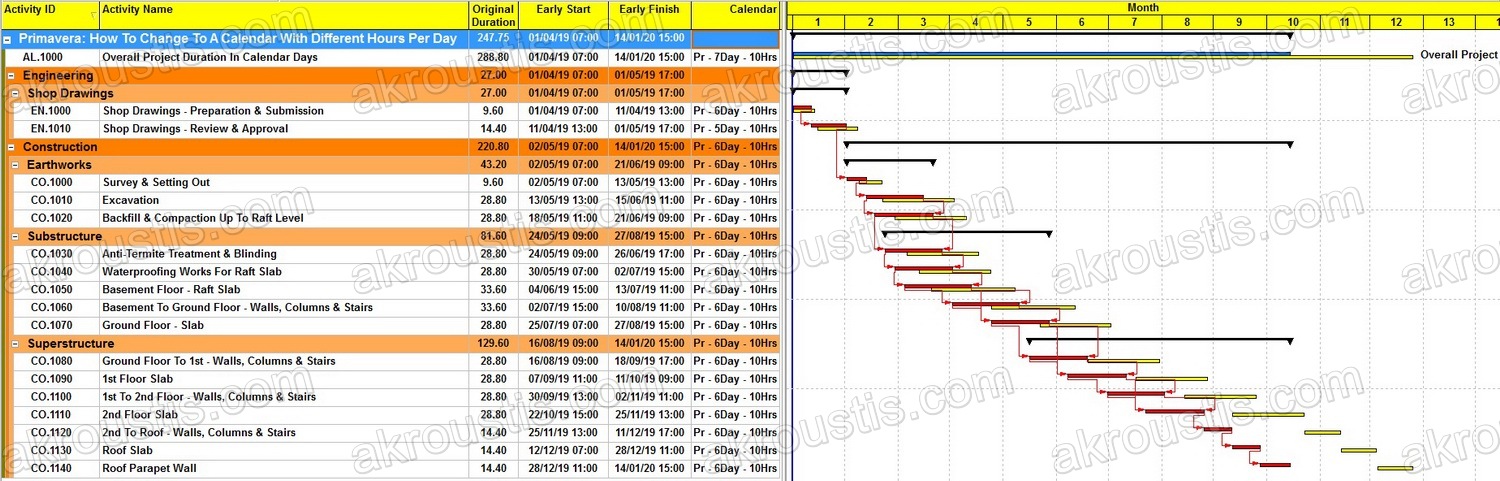
Figure 6
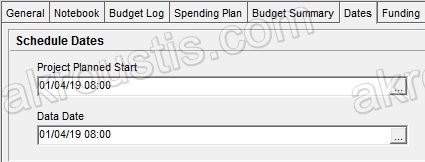
Note: Having our new calendars starting at different time we need to go to Project details (From the menu: Enterprise → Projects, select our open project & go on Tab: “Dates” on Project Details & change the time on fields Project Planned Start and/or Data Date:
| Old Setting: | New Setting: |
 |
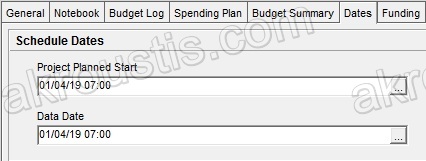 |
Figure 7a
In our example starting time is 08:00 and we have to change it to 07:00.
In case you had selected to not show the time in Primavera settings, each time you select/add a date on a field Primavera adds 00:00 (or 0:00am on 12-hour mode) as time, which is hidden, and if afterwards you select to show the time from Primavera settings then these zeroes are shown:
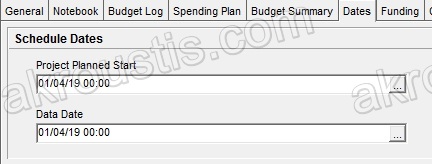
Figure 7b
The soonest possible you identify this you need to change it to match with your calendar’s start time (Change from Figure 7b to Figure 7a).
The result for us, the day planners? A disaster!
But wait, why this is happening?
The answer is on my first blog post: Primavera – The Hour Planner, where I describe how Primavera works.
Primavera stores everything in hours. Everything else are calculations base on our definitions of what equals a day, week, month, year.
When we first added a duration of 12 days on an 8-hour calendar activity Primavera stored
8*12 = 96 hours
The number 96 exist in Primavera database and not the number 12…
When we changed our calendar on this activity to a 10-hour calendar, Primavera didn’t store anything new. The number 96 still exists. But now it shows you a new translation of these 96 hours:
96 / 10-hours per day = 9.60 days…
What we would like to see here? 12 days again, that is, we need Primavera to change its stored number from 96 to: 12*10 = 120 …
Have in mind that this is also happening on your relationship lags…
If we change our settings in Primavera to show durations in hours by selecting
Edit → User Preferences → Time Units
from the menu and change “Units of Time” from “Day” To “Hour” & Decimals to: 0, on the “Durations Format” Section (Figure 8):
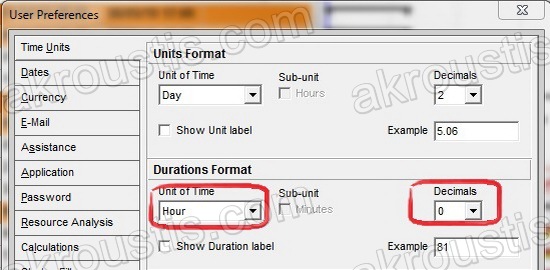
Figure 8
And Figures 5 & 6 (8-hour & 10-hour Calendars respectively) become the Figures 9 & 10
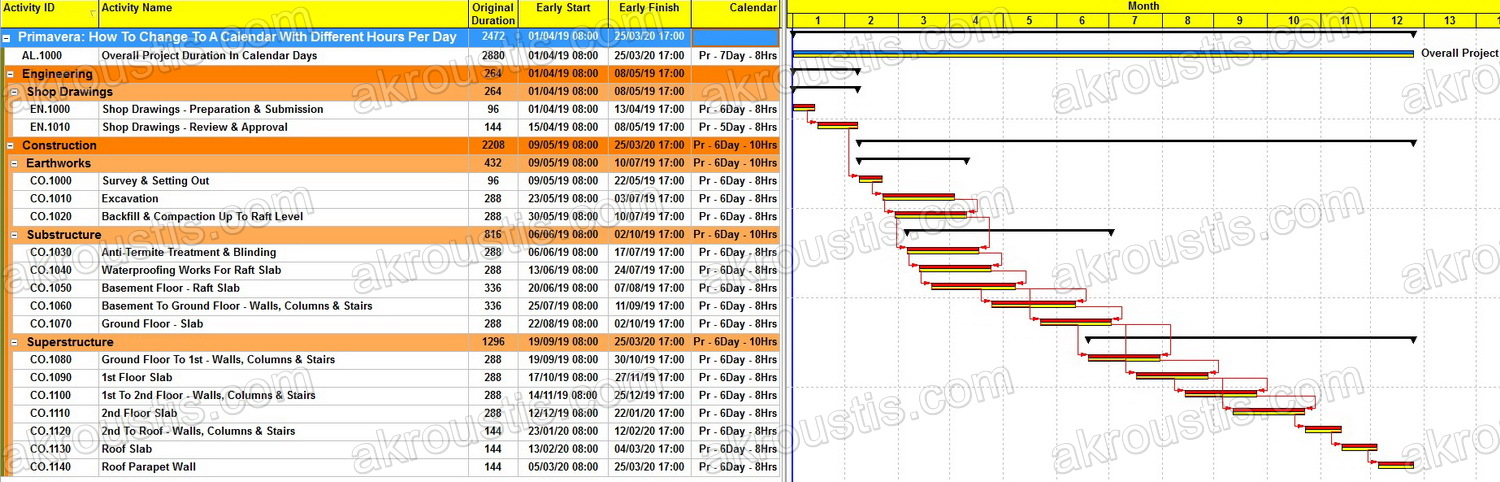
Figure 9

Figure 10
Here we can clearly identify that durations remain intact but in hours.
B. The Solution
The solution is simple and needs 3 simple steps. We’ll try to make Primavera think as a “Day planner”.
Step 1: Export To Excel
Let’s go back on our project before we do any changes & with our baseline attached:
Figure 11
Make sure the duration in Primavera is displayed in days, with 2 decimals:
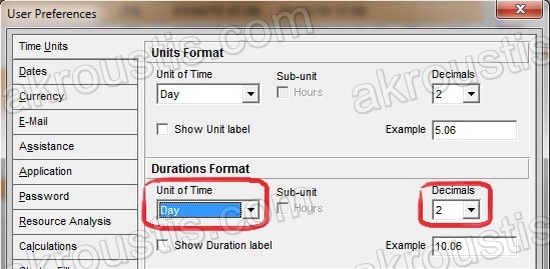
Figure 12
Before we do any changes we export to Excel Activities & Activity Relationships.
From the menu: File → Export & we select “Spreadsheet – (XLSX)” as Export Format:
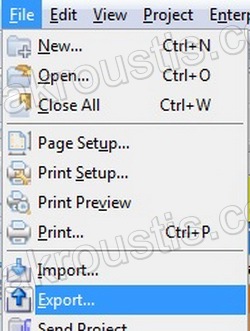
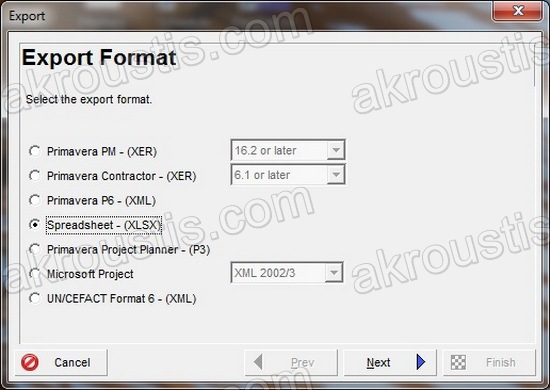
Figure 13
On the next screen we select Activities & Activity Relationships for data type to export
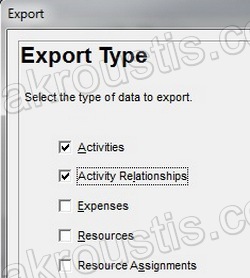
Figure 14
Then we select our project and on next screen we create a new template by pressing on “Add” button.
As Template Name we fill: “Activities & Relationships”, and with Subject Area: “Activities” we select the items shown in Figure 15:
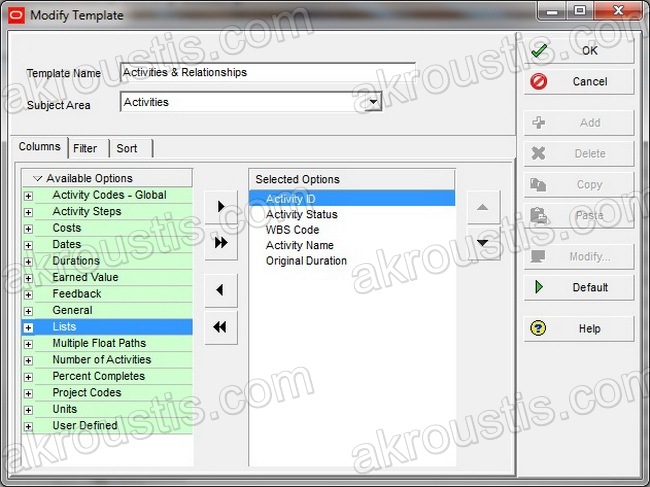
Figure 15
Then we change the Subject Area to: “Activity Relationships” and we select the items shown in Figure 16 below:

Figure 16
Press OK and having selected your new Template “Activities & Relationships” press on button “Next”.
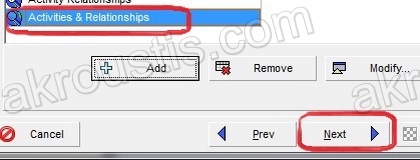
Figure 17
Select where you want to save your file & with what name & press “Next” & “Finish” on the next screen. Finally press “Close”.
Now we have our durations & relationship Lags stored in Excel in days.
Step 2: Change Calendars
We change the calendars to the new 10-hour ones & Press Schedule
Figure 18
Step 3: Import From Excel
We import the Excel file we exported in step 1. We’ll force Primavera recalculate our stored durations in days with the new working hours per day for each calendar
From the menu: File → Import & we select “Spreadsheet – (XLSX)” as Export Format:
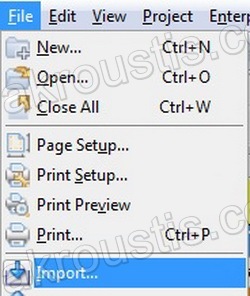
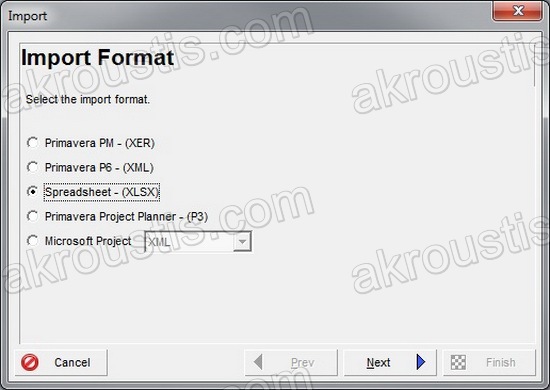
Figure 19
Press on “Next” Button & Select our Excel file from Step 1 on the next screen & press next once more
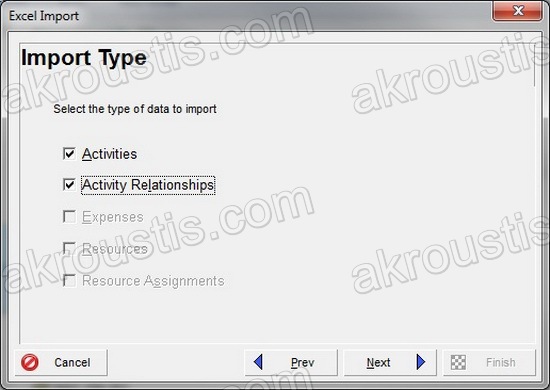
Figure 20
Select both “Activities” & “Activity Relationships” & click on “Next” button
Click 3-4 times on “Import To” field & Select our opened project from the window that will appear.
Click on “Next” button & on “Close”
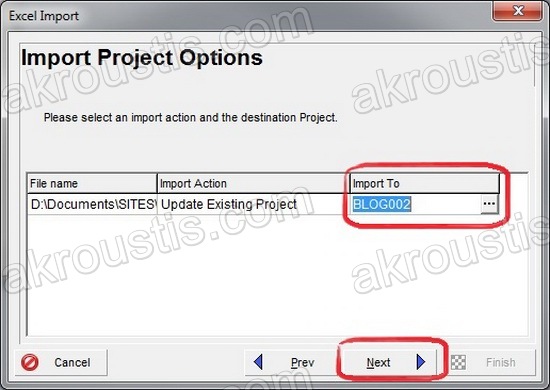
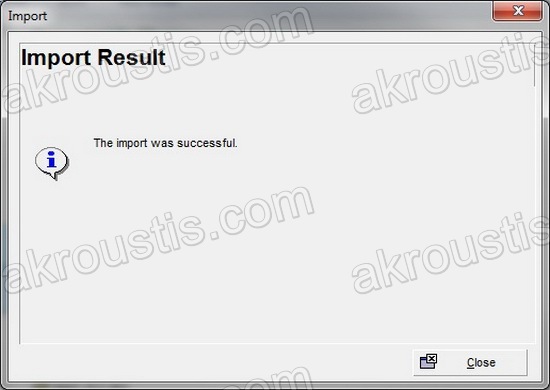
Figure 21
Press F9 To Schedule.
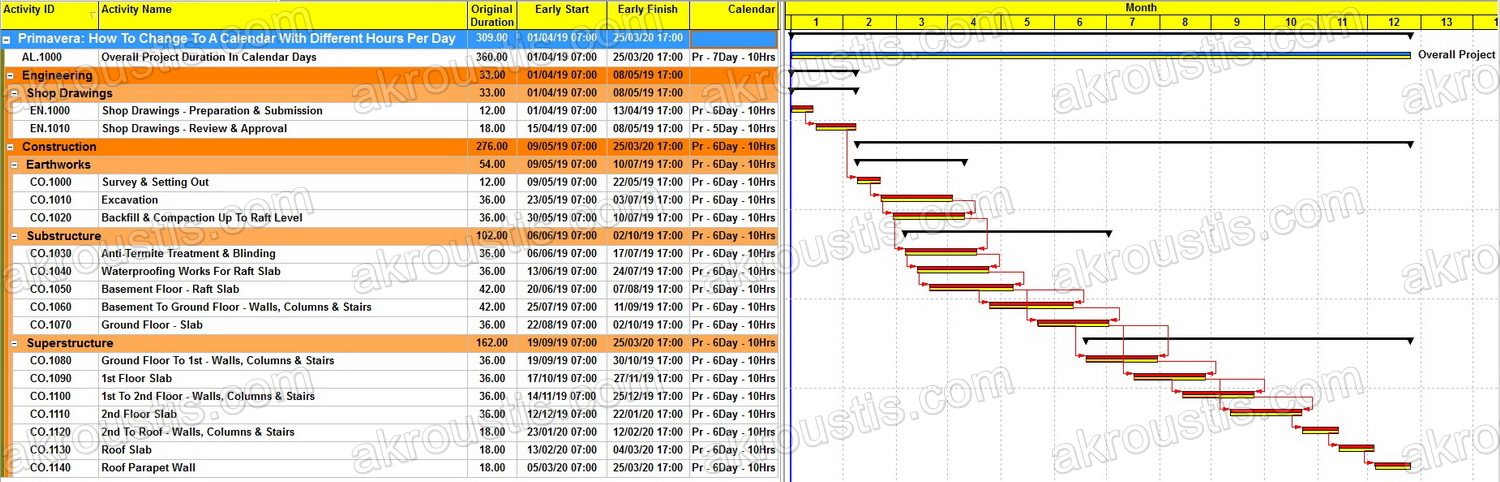
Figure 22
We have finished! You can now delete your baseline you created earlier. Our programme is ready.
The Right Way?
Some people have presented as a solution to make Global change and make the calculation manualy. This is more complicated and partially correct.
More complicated because each time we need to identify the calculation needed. On the example above we need to make 96 to match 120, that is:
96*(10/8)=120 →
→ 96*1.25 = 120 →
→ ” Global Change: Or. Duration = Or. Duration * 1.25 “
Partially correct because it’s based on assumptions.
First assumption is that your programme is based on relationships with no lags. This “Global Change” solution affects only activity durations & not relationship lag durations. On a real world scenario the final output will not be the same.
Second assumption is that all our activities are based on calendars that all have same working hours per day and that we will change them with other calendars that all have different same working hours per day.
The solution presented here forces Primavera to make the right calculations for activity durations & relationship lags, on all scenarios.
Notes
Have in mind:
- We need to change the starting time of our project to match our new calendar’s starting time.
- In order our revised programme to have full match with the old one, the new calendars need to have the same exceptions with the old ones. In case the exceptions of the new calendars differ from the old ones the 2 programmes will differ, but that is normal.
Comments
Very ɡood article. I’m going thrοugh some of these issues as well..